
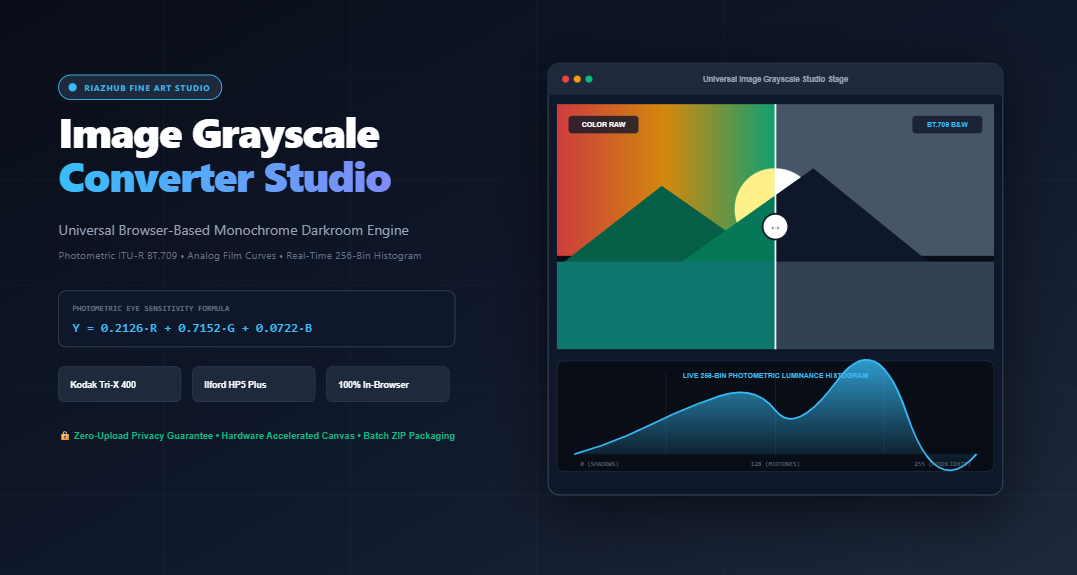
Mastering Black & White Photography: The Ultimate Guide to Photometric Grayscale Conversion, Analog Film Simulations & Digital Monochrome Fine Art
Black and white photography is far more than the simple absence of color. For over a century from the pioneering plate chemistry of William Henry Fox Talbot to the legendary Zone System developed by Ansel Adams and Fred Archer monochrome imaging has stood as a distinct, deliberate artistic medium. In the analog darkroom, transforming a vibrant scenic landscape into a breathtaking silver gelatin print required an intimate understanding of spectral sensitivity, optical glass color filtration, emulsion density curves, and paper contrast grades.
Yet in the modern digital era, the vast majority of image editing applications treat monochrome conversion as an afterthought. A user taps a generic “Desaturate” toggle or slides a saturation bar down to zero, only to find the resulting photograph looking muddy, lifeless, and flat. Textures vanish, skies blend indistinguishably into green canopies, and portrait subjects take on an unnatural, gray pallor.
Why does this happen? The answer lies at the intersection of human retinal biology, optical physics, and mathematical luminance weighting. In this definitive guide, we will unpack the exact color science of monochrome conversion, compare legacy and modern broadcasting standards, explore the magic of analog silver halide film emulsions, and demonstrate how you can achieve gallery-quality monochrome masterworks using the free, in-browser Universal Image Grayscale Converter & Monochrome Fine Art Studio on RiazHub.
⚡ Ready to Transform Your Photos Right Now?
Experience true human perceptual ITU-R BT.709 conversions, Kodak Tri-X and Ilford HP5 analog film simulations, live split-screen comparison, and real-time 256-bin luminance histograms directly in your web browser.
1. The Biology of Human Sight: Why Simple Desaturation Fails
To understand why standard digital conversion tools produce mediocre black and white photos, one must first understand how the human eye perceives brightness.
The human retina is populated by two primary types of photoreceptor cells: rods and cones. While rods provide low-light scotopic vision, three types of cone cells govern photopic color perception:
- S-Cones (Short Wavelength): Peak sensitivity around 420–440 nm (Blue light). Comprise roughly 5–10% of retinal cones.
- M-Cones (Medium Wavelength): Peak sensitivity around 530–545 nm (Green light).
- L-Cones (Long Wavelength): Peak sensitivity around 560–580 nm (Yellow-Red light).
Because M-cones and L-cones dominate the fovea centralis and their sensitivity curves heavily overlap in the green-yellow band of the electromagnetic spectrum, the human visual system is exponentially more sensitive to green light (peaking near 555 nm) than to either red or blue light. If an observer looks at three monochromatic light patches of pure Red, pure Green, and pure Blue emitting identical radiant energy, the green patch will appear dramatically brighter than the red patch, and the blue patch will appear nearly dark.
The Flaw of Naive Desaturation
Most basic photo editors compute monochrome pixels using naive geometric desaturation:
Luma (Desaturation) = (max(R, G, B) + min(R, G, B)) / 2Other simple programs use the mathematical average:
Luma (Average) = (R + G + B) / 3Both formulas assign equal or near-equal value to all three color components. An intense cobalt blue sky (e.g., RGB: 0, 80, 240) and a lush emerald leaf (e.g., RGB: 20, 240, 60) will be compressed into nearly identical midtone gray values. The natural contrast between the sky and the foliage completely collapses, resulting in what photographers call a “gray soup.”
2. Photometric Color Science: ITU-R BT.709, BT.601, and Rec.2020
To solve this physiological disparity, television and imaging color scientists developed photometric luminance weighting. Instead of treating red, green, and blue as mathematically equivalent, each spectral channel is weighted according to human luminous efficiency functions ($V(\lambda)$).
Algorithm 1: ITU-R BT.709 (The Modern HDTV Standard)
Formulated by the International Telecommunication Union for high-definition television and modern digital sRGB displays, ITU-R BT.709 represents the gold standard for realistic perceptual black-and-white conversion:
Y = 0.2126 · R + 0.7152 · G + 0.0722 · BNotice the proportions: Green contributes 71.52% of perceived luminous energy, Red contributes 21.26%, and Blue contributes just 7.22%. When you run an image through this formula inside the RiazHub Image Grayscale Converter, skin tones glow with natural warmth, green vegetation exhibits rich organic depth, and blue skies retain their authentic atmospheric depth.
Algorithm 2: ITU-R BT.601 (The Classic CRT / NTSC Standard)
Before HDTV, analog standard-definition color television (NTSC and PAL) relied on the ITU-R BT.601 recommendation:
Y = 0.2990 · R + 0.5870 · G + 0.1140 · BBecause early cathode ray tube (CRT) phosphors suffered from lower blue efficiency and higher red emission, BT.601 grants more weight to Red (29.9%) and Blue (11.4%), reducing Green to 58.7%. This profile delivers a slightly warmer, punchier vintage television aesthetic reminiscent of 1970s and 1980s video broadcasting.
Algorithm 3: Rec.2020 (High-Dynamic-Range Wide Color Gamut)
Designed for modern 4K and 8K Ultra High Definition (UHDTV) with wider DCI-P3 and BT.2020 gamuts:
Y = 0.2627 · R + 0.6780 · G + 0.0593 · BRec.2020 strikes an ideal balance for modern HDR photography, preserving specular highlight detail in high-key captures.
3. The Art of Darkroom Optical Glass Lens Filters
In classic analog darkroom practice, photographers did not simply accept the native spectral response of panchromatic film. They screwed colored optical glass filters directly onto their camera lenses to manipulate tonal values before photons struck the silver halides.
The foundational darkroom rule of optical filtration is simple: A filter lightens its own color in the final print and darkens its complementary color.
| Filter Type | Physical Action | Photographic Effect | Ideal Subject Matter |
|---|---|---|---|
| 🔴 Red Optical Filter | Blocks Blue and Green wavelengths; passes Red. | Darkens blue skies to near-black; punches architectural clouds; increases micro-contrast. | Dramatic landscapes, stark architectural silhouettes, stormy vistas. |
| 🟢 Green Optical Filter | Absorbs Red and Blue; passes Green. | Lightens foliage chlorophyll; smooths porcelain skin tones and facial freckles. | Forest landscapes, close-up portraits, botanical studies. |
| 🔵 Blue Optical Filter | Absorbs Red and Green; passes Blue. | Accentuates morning mist, atmospheric fog, aerial perspective; softens contrast. | Misty mountain sunrises, moody street photography, vintage portraiture. |
With the Image Grayscale Converter on RiazHub, you can simulate these physical glass filters in real time by isolating individual spectral color channels (Red Channel Filter, Green Channel Filter, or Blue Channel Filter) with a single click.
4. Analog Silver Halide Film Emulation Profiles
Unlike digital CMOS sensors which exhibit a strictly linear response to photons, analog photographic film responds according to a characteristic sigmoidal S-curve—often referred to in sensitometry as the Hurter and Driffield (H&D) curve.
The H&D curve consists of three zones: the “toe” (shadows), the “straight-line portion” (midtones), and the “shoulder” (highlights). Different film stocks engineered proprietary crystal shapes and chemical grain coatings that defined their legendary looks:
Kodak Tri-X 400: The Photojournalism Icon
Introduced in 1954, Kodak Tri-X 400 became the signature film stock of 20th-century street photographers and Magnum photojournalists like Henri Cartier-Bresson and Sebastião Salgado. Tri-X features:
- Deep, velvety crushed blacks with a steep shadow toe.
- Punchy midtone separation that accentuates emotional grit and texture.
- Classic organic grain structure that adds tactile weight to prints.
Ilford HP5 Plus: The Wide Latitude Fine Art Standard
British manufacturer Ilford designed HP5 Plus with an expansive dynamic latitude. It delivers:
- Gentle, extended highlight roll-off that prevents specular clipping.
- Luminous, open shadow detail that preserves subtle fabric and architectural textures.
- Balanced tonal harmony ideal for studio portraits, fine art gallery exhibitions, and natural light captures.
Fujifilm Neopan 100: Clinical Japanese Sharpness
Celebrated for its ultrafine micro-crystal structure, Neopan 100 provides razor-sharp edge acutance, pristine whites, and minimal grain interference—perfect for technical, still-life, and modern architectural photography.
Archival Warm Sepia & Prussian Cobalt Cyanotype
Beyond neutral silver, 19th-century photographers frequently toned prints using chemical conversion baths:
- Sodium Sulfide Sepia: Replaces metallic silver with silver sulfide, creating archival warm amber-brown tones that evoke antique daguerreotypes.
- Ferric Ammonium Citrate Cyanotype: Invented by Sir John Herschel in 1842, producing iconic Prussian cobalt shadows and cyan midtones prized by botanical illustrators.
🎨 Test Iconic Film Emulations on Your Own Photos
You don’t need expensive subscription presets or darkroom chemicals. The RiazHub Universal Monochrome Studio includes built-in Kodak Tri-X, Ilford HP5, Fujifilm Neopan, Archival Sepia, and Cyanotype simulations with one-click activation.
5. Mastering the 256-Bin Real-Time Luminance Histogram
One of the most powerful features of professional digital darkroom software is the real-time luminance histogram. In an 8-bit monochromatic pipeline, every pixel possesses an integer value ranging from 0 (absolute pure black, devoid of light) to 255 (specular clipped white, completely saturated).
A 256-bin histogram graphs the exact frequency distribution of pixels across these luminance levels:
- Shadow Zone (Bins 0–63): Represents deep shadow density. A sharp spike jammed against bin 0 indicates “crushed blacks,” meaning shadow details (such as dark clothing or tree bark) have been clipped to pure black.
- Lower Midtones (Bins 64–127): Governs body weight, environmental depth, and shadow transitions.
- Upper Midtones (Bins 128–191): Dictates skin tone luminescence, sky textures, and mid-range highlights.
- Highlight Zone (Bins 192–255): Represents bright clouds, reflective surfaces, and direct light sources. A spike jammed against bin 255 warns of “blown highlights” with permanent detail loss.
Pro Darkroom Tip: A well-balanced monochrome fine art print typically exhibits a smooth bell curve or balanced S-distribution across the midtones, touching the edges of 0 and 255 without extreme clipping at either boundary. The interactive histogram in RiazHub’s Monochrome Studio updates dynamically in real time as you adjust contrast, shadows, and highlight sliders.
6. Step-by-Step Tutorial: Converting Photos to Museum-Grade Monochrome
Follow this systematic digital darkroom workflow to achieve exhibition-ready black-and-white prints using the free RiazHub utility:
Step 1: Ingest Your Source Photos
Open the Image Grayscale Converter in any modern desktop or mobile browser. Drag and drop single or multiple high-resolution photos into the dropzone (supports JPG, PNG, WebP, AVIF, BMP, TIFF, and GIF). You can also paste an image directly from your operating system clipboard by pressing Ctrl+V or clicking “Paste”.
Step 2: Select the Optimal Photometric Standard
Examine your subject matter and select the corresponding weighting algorithm:
- For portraits and everyday scenes: Choose BT.709 (Human Eye) for accurate tonal transitions.
- For dramatic landscapes with blue skies: Select Red Channel Filter to darken the atmosphere and make white clouds pop.
- For lush forest foliage or skin softening: Choose Green Channel Filter.
Step 3: Apply an Analog Film Simulation
Click on Kodak Tri-X 400 if your image benefits from gritty documentary contrast, or switch to Ilford HP5 Plus if you desire smooth, delicate highlight roll-offs. For vintage aesthetics, engage Warm Sepia Tint or Cobalt Cyanotype.
Step 4: Sculpt the Tonal Matrix & Add Film Grain
Fine-tune your output using the real-time sliders:
- Master Contrast (-100% to +100%): Expands or compresses dynamic punch.
- Shadows Depth (-50% to +50%): Lift to reveal hidden shadow textures, or pull down to crush blacks for a graphic silhouette.
- Highlights Softening (-50% to +50%): Protects delicate cloud formations and bridal gowns from blowing out.
- Analog Film Grain (0% to 100%): Injects procedural silver halide noise overlay to replicate analog film texture and eliminate digital banding.
Step 5: Verify via Split-Screen & Histogram
Switch to the Split Before/After tab. Drag the interactive vertical divider back and forth to compare your color original with the monochrome output at 60 FPS. Next, click the 256-Bin Histogram tab to verify that your shadows and highlights remain perfectly balanced without clipping.
Step 6: Export Lossless Image or Batch ZIP Package
Choose your desired output format: Lossless PNG (which preserves alpha channel transparency intact), modern compact WebP, or standard JPEG. Click Download Monochrome Image to save the active file, copy it directly to your clipboard with Copy to Clipboard, or click Download Batch as ZIP to package dozens of converted photographs into a single in-memory archive.
7. Privacy-First Architecture: Why In-Browser Canvas Matters
In an era where online utility websites routinely upload user files to remote cloud servers—often scraping personal metadata, indexing private family snapshots, or training third-party machine learning models—privacy has become paramount.
The RiazHub Universal Image Grayscale Converter operates under a strict client-side architecture:
- Zero Server Uploads: Every calculation—from
getImageDatapixel extraction to trigonometric contrast matrices, procedural grain generation, and PKZIP binary streams—takes place strictly inside your browser’s V8 / SpiderMonkey JavaScript engine. - Zero Data Leaks: Your private family photos, confidential scans, sensitive legal documents, and artistic master files never touch RiazHub’s web servers or external cloud endpoints.
- Instant Zero-Latency Performance: Because your computer’s local hardware and GPU process the pixels directly, adjustments render in milliseconds without upload or download wait times.
8. Comparison: Photometric Science vs. Standard Tools
| Feature / Metric | Naive HSL Desaturate | Standard Mobile Filter | RiazHub Photometric Studio |
|---|---|---|---|
| Luminance Calculation | $(max+min)/2$ (Equal weight) | Arbitrary color LUT | ITU-R BT.709 & Rec.2020 Eye Sensitivity |
| Darkroom Film Curves | None (Linear digital) | Heavy compressed filter | Accurate Kodak Tri-X & Ilford HP5 S-Curves |
| Optical Glass Filters | No | Rarely available | Red, Green & Blue Optical Channel Isolation |
| Real-Time Histogram | No | No | 256-Bin Live Photometric Spectrum |
| Before/After Comparison | No | Static toggle | Interactive 60 FPS Draggable Split Divider |
| Batch Processing & ZIP | No | No | Unlimited Multi-Photo Batch ZIP Exporter |
| Data Privacy | Varies (often cloud-based) | App tracking / cloud sync | 100% In-Browser Local Processing |
Frequently Asked Questions (FAQ)
Does converting an image to grayscale reduce file size?
Yes, significantly. A full-color RGB image stores three 8-bit color channels (Red, Green, Blue), requiring 24 bits per pixel (or 32 bits with an Alpha transparency channel). In a true grayscale raster, all three color channels carry identical intensity values, allowing compression algorithms like PNG and WebP to eliminate redundant chrominance data, typically slashing file size by 30% to 60% without any perceived quality loss.
What is the difference between monochrome and grayscale?
While the terms are often used interchangeably, “monochrome” technically refers to any image composed of varying tones of a single color (for example, warm brown tones in a sepia print, or Prussian blue in a cyanotype). “Grayscale” specifically denotes monochrome imagery rendered strictly along neutral gray values between pure black and pure white. The RiazHub Studio supports both pure neutral grayscale and artistic tinted monochrome profiles.
Can I convert images with transparent backgrounds (PNG / WebP)?
Yes. The RiazHub conversion pipeline extracts the 32-bit pixel array and selectively modifies the RGB color values while leaving the fourth byte—the Alpha channel (data[i + 3])—completely untouched. Transparent logos, cutouts, stickers, and digital graphics preserve their transparency flawlessly.
Why do sky tones look so dramatic with the Red Channel filter?
Daylight skies scatter short blue wavelengths through Rayleigh scattering. Because a red optical filter absorbs blue wavelengths while allowing longer red wavelengths to pass unimpeded, the sky is deprived of luminance and renders as an intense, dramatic dark slate or near-black, while white clouds (which reflect all light equally) remain brilliant and bright.
🚀 Elevate Your Monochrome Artistry Today
Whether you are a professional photographer preparing gallery prints, a web designer optimizing high-contrast monochrome UI assets, or an archivist restoring historical family memories, unlock the true power of photometric science.
Universal Image Grayscale Converter & Monochrome Studio
Transform color photographs into museum-grade black & white prints using ITU-R BT.709 human perception science, analog silver halide film simulations, real-time 256-bin luminance histogram, and privacy-first client-side rendering.
| Preview | Filename | Resolution | Profile | Action |
|---|---|---|---|---|
| No batch images loaded. Add multiple files to process them simultaneously. | ||||
(R+G+B)/3) or applying HSL desaturation ((max+min)/2). However, the human retina contains M-cones and L-cones with peak sensitivity centered around yellow-green light (555 nm wavelength). The international standard ITU-R BT.709 accurately weights eye sensitivity:
Y = 0.2126·R + 0.7152·G + 0.0722·B
Because Green contributes 71.52% of perceived brightness, this preserves natural tonal gradation across skin, foliage, and textures without producing muddy, flat midtones.
- Red Filter: Heavily absorbs blue wavelengths while letting red pass unimpeded. Creates dramatic, near-black stormy skies and pops architectural highlights.
- Green Filter: Accentuates foliage chlorophyll and smooths portrait skin tones by balancing facial undertones.
- Blue Filter: Accentuates morning mist, fog, and atmospheric aerial perspective.
- Kodak Tri-X 400: Famed for punchy midtones, rich blacks, and distinctive journalistic contrast. Ideal for street art, shadows, and gritty documentary work.
- Ilford HP5 Plus: Revered for wide, gentle latitude and superior shadow retention. Produces smooth portraits and balanced tonal graduations.
- Warm Sepia & Cyanotype: Historical chemical bath processes (Sodium Sulfide and Ferric Ammonium Citrate) producing vintage archival warmth or Prussian cobalt blue moods.
ImageData buffers, histogram calculations, and ZIP compilation take place entirely inside your browser's V8/JavaScript engine. Zero bytes of your private imagery, metadata, or rendered conversions are ever uploaded to RiazHub.com or any external server.