
How to Make Official Biometric Passport and Visa Photos at Home (Complete 300 DPI & ICAO 9303 Guide)
Stop overpaying $15 to $25 at retail pharmacy kiosks. Learn how to take an official government-compliant passport or visa photo with your smartphone, auto-align ICAO 9303 face guides, replace backdrops, and generate print-ready 300 DPI multi-up sheets with the free RiazHub Universal Passport & Visa Photo Maker Studio.
⚡ Need Your Passport Photo Ready Right Now?
Skip the reading and generate your official 2×2″, 35×45mm, or 4×6cm passport photos in 30 seconds with 100% private in-browser processing.
Why Are Passport & Visa Photos Rejected So Often?
According to consular statistical data from the US Department of State, the UK Home Office, and European Schengen visa centers, improper photographs are the #1 administrative reason for visa and passport application processing delays. Common rejection factors include:
- Incorrect Crown-to-Chin Face Ratio: Border control biometrics require your head to occupy exactly 70% to 80% of the vertical frame. Photos that are zoomed too close or too far away fail automatic facial recognition scanners.
- Uneven Lighting and Harsh Head Shadows: Shadows behind ears, dark patches on the jawline, or flash reflections on glasses cause biometric border gates (e-Gates) to reject the image.
- Wrong Background Tint: Many consulates strictly reject colored, patterned, or textured wallpapers. Pure white, off-white, or consulate light blue is mandatory depending on the country.
- Low Resolution or Incorrect DPI: Submitting a standard 72 DPI screen capture or compressed smartphone photo results in pixelated, blurry prints. Consular specifications demand continuous-tone printing at true 300 DPI.
- Oversized Digital Files on Visa Portals: Online submission systems like the US DS-160, Saudi eVisa, and UK Visas strictly enforce byte limits (often under 240 KB or 100 KB), rejecting high-resolution camera uploads outright.
To solve these issues without hiring a studio photographer, you can use the free web tool Passport & Visa Photo Maker Studio on RiazHub.com, which handles biometric mathematical alignment, DPI scaling, and byte clamping completely in your browser.
International Biometric Standards Comparison Table
Every country enforces its own dimension criteria. Below is an official breakdown of key global specifications supported natively by the RiazHub Passport Photo Maker:
| Country / Standard | Physical Size | Pixel Grid (300 DPI) | Approved Backdrop | Face Coverage (Crown-to-Chin) |
|---|---|---|---|---|
| United States (US Passport & Visa) | 2 × 2 inches (51 × 51 mm) | 600 × 600 px | Pure White | 50%–69% (1 to 1 3/8 inches) |
| United Kingdom & Schengen / EU | 35 × 45 mm | 413 × 531 px | Off-White / Light Gray | 70%–80% (32 to 36 mm) |
| Saudi Arabia (Umrah / Hajj / Visa) | 40 × 60 mm (4×6 cm) or 2×2″ | 472 × 708 px | Pure White | 70%–80% centered |
| Pakistan (Passport, NICOP, CNIC) | 35 × 45 mm | 413 × 531 px | Pure White | 70%–80% centered |
| Canada (Passport & Permanent Resident) | 50 × 70 mm | 591 × 827 px | Pure White | 31 to 36 mm from chin to crown |
| China (Visa & Tourist Permits) | 33 × 48 mm | 390 × 567 px | Pure White | 28 to 33 mm head height |
| India (OCI & Passport) | 2 × 2 inches or 35 × 45 mm | 600 × 600 px | Plain White / Light Tint | 70%–80% centered |
Understanding ICAO Document 9303 Biometric Compliance
The International Civil Aviation Organization (ICAO) Document 9303 establishes the technical parameters for Machine Readable Travel Documents (MRTD). Border e-Gates use infrared and visible light sensors to scan the geometric distance between your eyes, nose base, lip edges, and chin tip.
If your face is tilted even by 5 degrees, or if the crown of your hair extends outside the 70%–80% ratio zone, the biometric algorithm fails to generate a valid mathematical face hash.
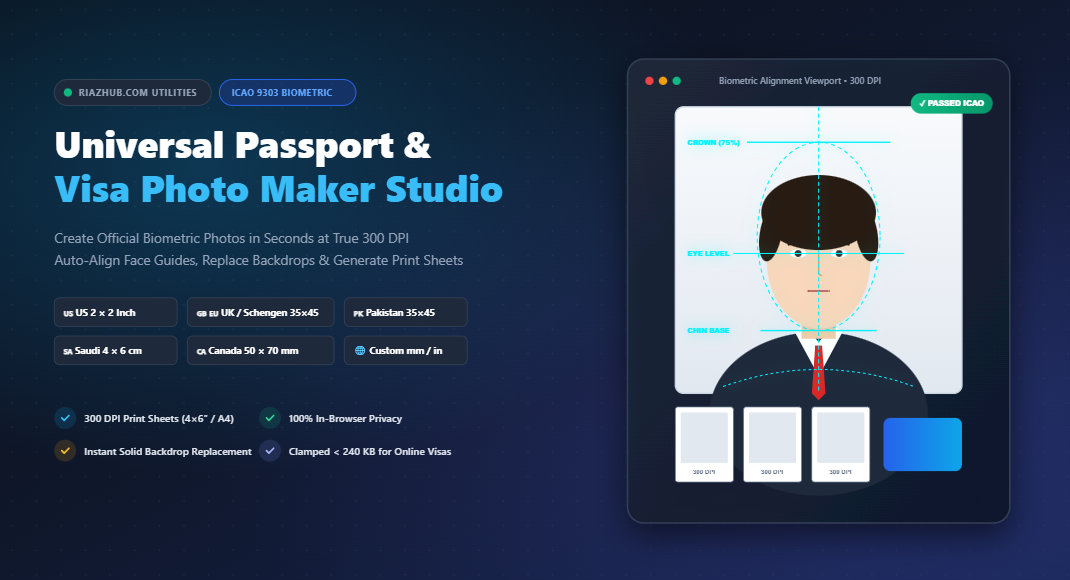
The Universal Passport Photo Maker tool includes an interactive visual biometric HUD that displays:
- Crown Line: Calibrated at 10%–12% from the top margin to mark the highest point of your hair.
- Eye Level Horizon: Positioned at ~42% from the top to guarantee horizontal alignment.
- Chin Base Line: Marked at ~78% from the top, ensuring exactly 70%–80% head height occupancy.
- Shoulder Clearance Rims: Curved arcs showing proper chest-to-shoulder clearance.
- Fine Tilt Straightener: A micro-stepper slider allowing ±15.0° rotations at 0.1° precision so you can fix slight head tilts effortlessly.
The Mathematics of True 300 DPI Multi-Up Print Sheets
Why can’t you simply paste a selfie into a Word document and print it? Standard office printers expect a resolution specification in DPI (Dots Per Inch). If an image has an unspecified DPI or is rendered at standard web resolution (72 or 96 DPI), the printer driver scales the photo arbitrarily, distorting physical dimensions.
The mathematical formula for continuous-tone 300 DPI physical prints is:
For instance, a standard UK/Schengen photo measuring 35×45 mm converts to exactly 413 × 531 pixels.
Printing single photos at a commercial photo kiosk is expensive ($15+ per pair). However, pharmacies like Walgreens, CVS, Boots, and Walmart print standard 4×6 inch (10×15 cm) photo prints for just $0.35 to $0.40.
By generating a 4×6 inch 300 DPI tiled sheet with 6 identical photos and scissor cutting lines using the RiazHub Print Sheet Generator, you can print a batch of official photos for pennies!
Create Your 4×6″ Print Sheet in 3 Simple Clicks
Tile 2, 4, 6, or 8 photos with scissor cutting lines on 4×6″, 5×7″, or A4 paper at true 300 DPI.
How to Take an Official Passport Photo at Home (5 Golden Rules)
You don’t need a high-end DSLR camera. A modern iPhone, Samsung, or Google Pixel smartphone produces more than enough resolution. Follow these five rules:
1. Stand 4 to 6 Feet Away
Do not take an arm’s-length selfie! Selfies suffer from wide-angle lens barrel distortion (making noses appear wider). Have someone hold the phone at eye level from 5 feet away, or use a tripod with a timer.
2. Face a Window with Natural Daylight
Direct daylight facing a window provides soft, diffused, shadow-free illumination on both sides of your face. Avoid overhead ceiling lights that cast dark bags beneath your eyes.
3. Neutral Expression & Mouth Closed
Biometric cameras require a neutral expression. No smiling, no grinning, no raised eyebrows. Keep both eyes open, looking directly into the camera lens with lips gently sealed.
4. Remove Glasses & Accessories
US and international standards strictly forbid eyeglasses in passport photos (glare blocks iris recognition). Remove hats, headbands, and large jewelry. Religious head coverings are accepted if the full face from hairline to chin is visible.
Step-by-Step Guide: How to Use the RiazHub Photo Studio
- Load Your Portrait: Go to the RiazHub Passport & Visa Photo Maker. Drag and drop your photo into the dropzone, click “Select Portrait”, or press
Ctrl+Vto paste from your clipboard. If you just want to test how it works, click the “Load Sample Portrait” button. - Select Country Standard: Click on your target country pill (US 2×2″, UK/Schengen 35×45mm, Saudi 4×6cm, Pakistan, Canada, or Custom).
- Align Face to Biometric Guidelines: Toggle the “Show ICAO 9303 Biometric Guide Overlay”. Click and drag your image inside the canvas to position your eyes along the eye horizon line and your chin above the chin line. Use the Zoom and Fine Tilt Straightener sliders for exact precision.
- Synthesize Solid Backdrop (Optional): If your original wall has shadows or an off-white hue, check “Replace Backdrop with Official Solid Color” and pick pure white or light gray. The Euclidean chroma isolator automatically cleans the background.
- Configure Print Sheet & Export: Select your preferred paper size (4×6 inch, 5×7 inch, or A4), choose how many photos you want (e.g., 6 photos), check “Include Scissor Cutting Guides”, and click “⚡ Generate Passport Photos”.
- Download or Copy: Download the single digital photo (automatically clamped under 240 KB for online visa uploads), download the 300 DPI print-ready sheet, or copy directly to your clipboard.
Why In-Browser Privacy Matters for Your Biometrics
Your face biometric data is personal and permanent. Unlike passwords, you cannot change your face if it is leaked or stored on an unverified third-party cloud server.
Unlike other online converters that upload your selfies to external servers, the RiazHub Passport Photo Maker Studio is engineered with 100% client-side JavaScript and HTML5 Canvas technology. Every rotation, crop, color synthesis, and export happens purely inside your device’s memory. Zero bytes leave your computer or phone.
Frequently Asked Questions (FAQ)
Can I use this tool on my smartphone?
Yes! The RiazHub Photo Maker is 100% responsive. You can snap a photo with your mobile camera, open the tool in Chrome or Safari, drag to align your face, and download the print sheet directly to your phone’s photo library.
How do I print the 4×6″ sheet at Walgreens, CVS, or Boots?
Upload the downloaded 4×6″ sheet to the pharmacy app or copy it to a USB drive and insert it into their photo kiosk. Select standard “4×6 inch Glossy Photo Print” (usually $0.35–$0.40). Important: Ensure the print kiosk setting is set to “100% Actual Size” or “Do Not Scale / Do Not Fit” so the individual 35×45mm or 2×2″ measurements remain mathematically accurate.
What if my online visa portal rejects the file for being too large?
Online portals such as the US Department of State CEAC DS-160 application strictly require files under 240 KB. In the RiazHub Studio, keep the “Digital Visa Target File Size Clamping” set to “Clamp Under 240 KB”. The built-in binary search algorithm ensures the exported JPEG meets the byte limit without sacrificing facial sharpness.
Ready to Create Your Compliant Passport Photo?
Save time, save money, and guarantee 100% biometric compliance with RiazHub’s studio tool.
Universal Passport & Visa Photo Maker Studio
Crop photos to official international standards, align face guides, replace backgrounds, and generate 300 DPI multi-up print sheets in real time with 100% in-browser privacy.
ICAO Document 9303 Compliance
ICAO Doc 9303 sets the global standard for Machine Readable Travel Documents (MRTD). The face crown-to-chin guideline must measure between 70% and 80% of the overall frame so airport biometric e-Gates can accurately match facial geometry.
Why True 300 DPI Resolution Matters
At 300 Dots Per Inch (DPI), individual ink droplet dots blend seamlessly into continuous photorealistic skin tones. Standard home printers rasterize at 300 DPI, making our tiled multi-up sheets 100% compliant with consulate inspection magnifying lenses.
Zero Server Upload Privacy Guarantee
Your biometric data never leaves your device. All rotation, cropping, chroma replacement, and high-DPI sheet assembly execute in-memory using HTML5 Canvas & Web Cryptography APIs directly within your web browser.
Physical Printing Instructions
When printing the 4×6″ or 5×7″ sheet at home or at a pharmacy/print kiosk (Walgreens, CVS, Boots), set the print size to 100% (or "Actual Size / Do Not Scale") and choose glossy photo paper for optimal consulate acceptance.