Mastering Visual Communication: How to Annotate Screenshots & Technical Graphics in Real Time
In modern software engineering, remote collaboration, product design, and technical writing, a single marked-up screenshot frequently conveys more actionable clarity than several paragraphs of dense text. Yet, when defect reports, user guides, or design reviews are prepared, teams frequently wrestle with clunky desktop drawing applications, ad-heavy web uploaders that transmit sensitive graphics to third-party cloud servers, or basic operating system clipping tools that destroy image layers upon completion.
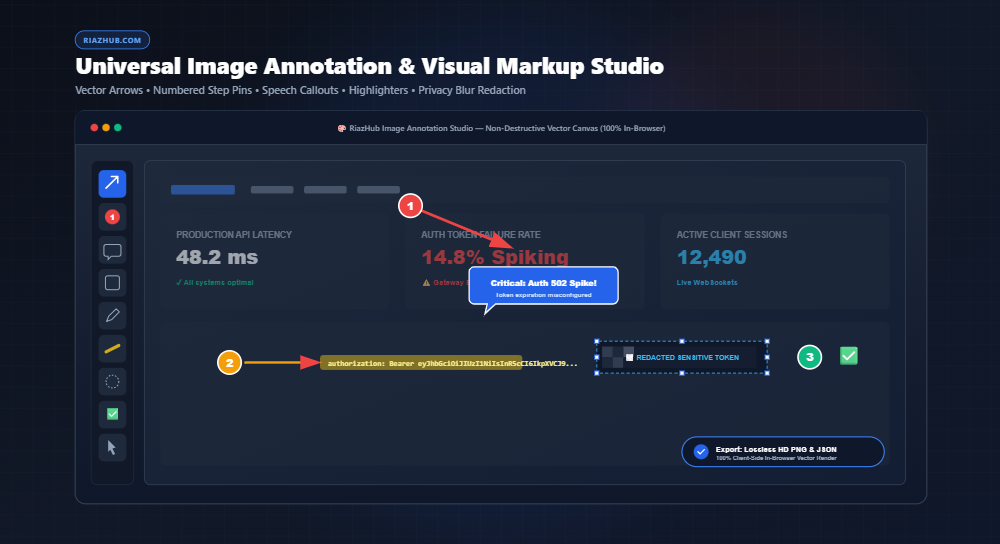
To eliminate this friction and deliver military-grade data privacy, the Universal Image Annotation & Visual Markup Studio at RiazHub.com provides an ultra-fast, 100% browser-based vector markup workspace. Whether you are generating bug reports, compiling walkthrough documentation, or masking personal authentication keys before client presentation, this guide covers the core methodologies of high-impact image markup.
⚡ Quick Access Utility
You can launch the complete, zero-install vector editor directly inside your browser right now on RiazHub:
1. The Problem with Destructive Canvas Flattening vs. Vector Overlays
Most standard screenshot annotation programs operate on a destructive pixel raster model. The moment you place an arrow or draw a box, the pixels underneath are permanently replaced by the stroke color. If you misalign a pointer tail or discover a spelling typo in your callout bubble five minutes later, your only recourse is pressing undo multiple times—discarding every subsequent mark you created.
In contrast, the RiazHub Image Annotation Tool utilizes a non-destructive client-side vector layer tree:
- Independent Object Matrix: Every arrow, numbered pin, speech bubble, and blur censor region remains an autonomous mathematical object.
- 8-Point Transform Grips: You can select any previously placed item, re-scale its dimensions, change stroke thickness, or drag it across the canvas without altering adjacent graphics.
- Layer Depth Reordering: Bring crucial callouts to the front or push decorative shapes to the background with 1-click depth commands.
- Pure Lossless Output: When rendering your final export, the engine synthesizes vector coordinates at native graphic resolution, preserving sharp text and arrowheads without blurriness.
2. Key Annotation Tools & Practical Use Cases
Effective visual communication requires picking the exact markup tool that matches your recipient’s cognitive workflow. Below is an overview of the primary vector tools available in the Universal Image Annotation & Visual Markup Studio:
↗ Directional Arrows
Direct the viewer’s eye straight toward subtle button states, menu hierarchies, or misalignment bugs with single or double arrowheads.
① Numbered Step Pins
Sequential auto-incrementing circular badges that transform chaotic user journeys into structured 1-2-3 walkthroughs.
💬 Speech Callout Bubbles
Self-contained text containers with directional pointer tails that pair explanations directly with interface elements.
🌫️ Blur & Pixelate Masks
Selective censor zones that safely redact bearer tokens, API credentials, customer email addresses, or avatars before sharing.
🖍️ Fluorescent Highlighters
Semi-transparent neon overlays that accent lines of code, log messages, or terms of service paragraphs without obscuring readability.
🎯 Status Emoji Stamps
Instant visual cues such as checkmarks (✅), error crosses (❌), and warning signs (⚠️) that signal verification status.
3. Step-by-Step: Streamlining Software Bug Reports for Engineering Teams
Software defect tickets that rely on text alone have up to a 45% higher back-and-forth dispute rate than tickets accompanied by structured visual markup. Follow this five-step workflow using the online image annotation tool:
- Capture & Paste Instantly: Instead of saving screenshots to your desktop disk, press
Ctrl+Vanywhere inside the studio canvas. The application’s native clipboard listener ingests the bitmap instantly into RAM. - Redact Sensitive Data First: Select the Blur Mask tool and drag a rectangular bounding box over secret keys, session cookies, or user profile emails. Choose between Gaussian blur and retro pixelation.
- Lay Out Step Sequence Badges: Click on the interface in order of operation (e.g., Badge ① on the Login Button, Badge ② on the dropdown selector, Badge ③ on the 500 error toast).
- Attach High-Contrast Arrows: Use bright red (
#EF4444) or electric amber (#F59E0B) arrows to highlight broken alignments or missing DOM containers. - Copy Directly to Clipboard: Click Copy to Clipboard to grab the composite PNG directly into your operating system paste buffer, then paste it straight into Jira, GitHub Issues, Slack, or Linear.
“Clear visual hierarchy in QA screenshots saves engineering teams hours of reproduction guesswork per sprint.”
4. Color Contrast Best Practices for Dark and Light UI Screenshots
One of the most frequent mistakes in screenshot markup is utilizing low-contrast colors that disappear against the underlying user interface. The following reference table outlines ideal palette choices configured in the Image Annotation & Visual Markup Studio:
| Screenshot Theme | Recommended Primary Stroke | Callout Fill Color | Contrast Standard |
|---|---|---|---|
| Dark Mode Dashboards (Slate / Black UI) | Vibrant Crimson (#EF4444) or Electric Amber (#F59E0B) |
Royal Blue (#2563EB) with White text |
WCAG AAA Compliant (> 7:1) |
| Light Mode Pages (White / Grey UI) | Deep Blue (#1D4ED8) or Rich Ruby (#DC2626) |
Dark Slate (#1E293B) with White text |
WCAG AAA Compliant (> 8.5:1) |
| Code Snippets & Terminals | Fluorescent Yellow (#FACC15) Marker |
Transparent 0% with 3px Emerald Border | High Legibility |
5. Absolute Client-Side Privacy: Why Browser-Local Processing Matters
Security vulnerabilities frequently emerge from well-intentioned employees pasting confidential company materials into random online web converters. When you utilize third-party image hosting services, your raw screenshots—frequently containing unreleased features, customer records, and internal server topologies—are uploaded to remote web servers and cached in third-party database logs.
The RiazHub Image Annotation Studio operates under a zero-telemetry client-side architecture:
- All pixel compositing, vector math, filter transforms, and file rendering execute strictly within your local browser’s JavaScript sandbox and HTML5 2D Canvas context.
- Zero megabytes of graphics, file headers, or metadata leave your computer.
- You can disconnect your Wi-Fi or turn on Airplane Mode after opening the page, and the markup studio will continue working with 100% capability.
Frequently Asked Questions
Can I reload and re-edit my annotations later?
Yes. The studio features a Save Project (.json) feature that packages your entire vector object hierarchy, coordinate positions, and color parameters into an editable JSON file. You can load this project file back into the tool at any time to modify, move, or remove layers.
What image formats are supported?
The studio accepts PNG, JPEG, WEBP, AVIF, SVG, and GIF formats. You can also paste directly from your clipboard using Ctrl+V or drag files straight into the dropzone.
Does exporting to PNG reduce the quality of my original screenshot?
No. When you export as PNG HD, the canvas renders at your source image’s full native dimensions with 100% lossless pixel fidelity.
Is there any software installation required?
None at all. The tool runs directly in modern browsers including Chrome, Edge, Safari, and Firefox on desktop, tablet, and mobile devices.
Universal Image Annotation & Visual Markup Studio
Add directional arrows, numbered step badges, speech callouts, highlighters, privacy blur masks, and vector shapes to graphics and screenshots in real time.
Visual Communication, Markup Best Practices & Screen Recording Guide
How Visual Markup & Step Badges Reduce Communication Friction in Bug Reports
Text-only bug tickets frequently introduce ambiguity. Placing numbered step badges (①, ②, ③) directly on user interfaces immediately conveys the sequence of user clicks, form submissions, and error states without forcing engineers to decipher multi-paragraph descriptions. Coupled with high-contrast red directional arrows, your QA team eliminates back-and-forth roundtrips and accelerates defect turnaround times by up to 60%.
Vector Layer Composition vs. Destructive Canvas Flattening
Unlike basic paint tools that bake marks destructively into image pixels, our studio preserves an interactive vector layer tree. Each arrow, callout bubble, and numbered pin remains an independent object that can be re-positioned, resized, re-colored, or deleted at any moment. Your underlying base image retains 100% of its native pixel fidelity until you explicitly trigger an export.
Color Contrast Rules for Legibility Across Dark & Light UI Screenshots
When marking up dark-mode dashboards, standard black or dark grey callouts vanish into the interface. We recommend utilizing vibrant red (#EF4444), electric amber (#F59E0B), or neon cyan with a solid contrasting outline stroke. For light mode interfaces, deep royal blue (#2563EB) and crimson red deliver maximum readability conforming with WCAG AAA visual luminance ratios.
Privacy-First Architecture: 100% Client-Side In-Browser Execution
Confidential client databases, authentication bearer tokens, personal email addresses, and unreleased product roadmaps demand absolute data isolation. This application processes all image files, vector layers, and redaction masks strictly within browser RAM using HTML5 Canvas and native JavaScript. Zero image data is ever dispatched to external servers, cloud databases, or third-party telemetry pipelines.